> ## Documentation Index
> Fetch the complete documentation index at: https://www.thundercompute.com/docs/llms.txt
> Use this file to discover all available pages before exploring further.
# Run GPT‑OSS 120B on Thunder Compute
> Deploy GPT-OSS 120B on Thunder Compute hardware. Initialize the large language model and configure the local environment for high-performance use.
Looking for the **cheapest way to self‑host GPT‑OSS 120B** or just want to **try it out** without buying hardware? Thunder Compute lets you spin up pay‑per‑minute NVIDIA A100 GPUs, so you only pay for what you use. Follow the steps below to get the model running in minutes.
> **Prerequisite:** Ensure your Thunder Compute account is ready. If not, start with our [Quickstart Guide](/vscode/quickstart).
## Step 1 — Create a Cost‑Effective Development‑Mode GPU Instance
Launch an 80 GB A100 instance (large enough to host the full 120 B model):
```bash theme={null}
tnr create \
--gpu a100xl \
--vcpus 4 \
--mode development \
--persistent-disk 200 \
--template "ollama"
```
This command starts a lower‑cost [development‑mode](/development-vs-production#development-mode) instance with:
* **GPU:** A100 80 GB
* **vCPUs:** 4
* **Storage:** 200 GB (from the *Ollama* template)
> The GPU, vCPU Count, and Mode ([Development](/development-vs-production#development-mode) / [Production](/development-vs-production#production-mode)), can be changed later if your requirements change, and the amount of storage can be increased if needed.
For details on templates, see the [Instance Templates guide](/guides/using-instance-templates).
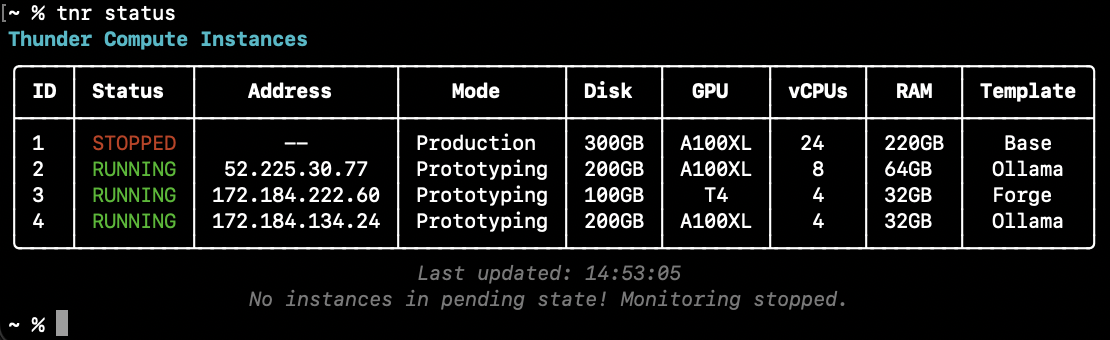
## Step 2 — Check Status and Connect
Verify that the instance is running, it can take a minute to spin up:
```bash theme={null}
tnr status
```
 Connect to the instance:
```bash theme={null}
tnr connect
```
## Step 3 — Start Ollama and Download the Model
Inside the instance, start Ollama (this also launches OpenWebUI and a Cloudflare tunnel):
```bash theme={null}
start-ollama
```
While the UI is initializing, download the model, here we are downloading the 120B variant of GPT‑OSS, but any models can be downloaded from the [Ollama Model Library](https://ollama.com/library):
```bash theme={null}
ollama pull gpt-oss:120b
```
> **Tip:** If you encounter issues, consult the [troubleshooting guide](/troubleshooting).
Give the UI about 60 seconds to finish loading.
Connect to the instance:
```bash theme={null}
tnr connect
```
## Step 3 — Start Ollama and Download the Model
Inside the instance, start Ollama (this also launches OpenWebUI and a Cloudflare tunnel):
```bash theme={null}
start-ollama
```
While the UI is initializing, download the model, here we are downloading the 120B variant of GPT‑OSS, but any models can be downloaded from the [Ollama Model Library](https://ollama.com/library):
```bash theme={null}
ollama pull gpt-oss:120b
```
> **Tip:** If you encounter issues, consult the [troubleshooting guide](/troubleshooting).
Give the UI about 60 seconds to finish loading.
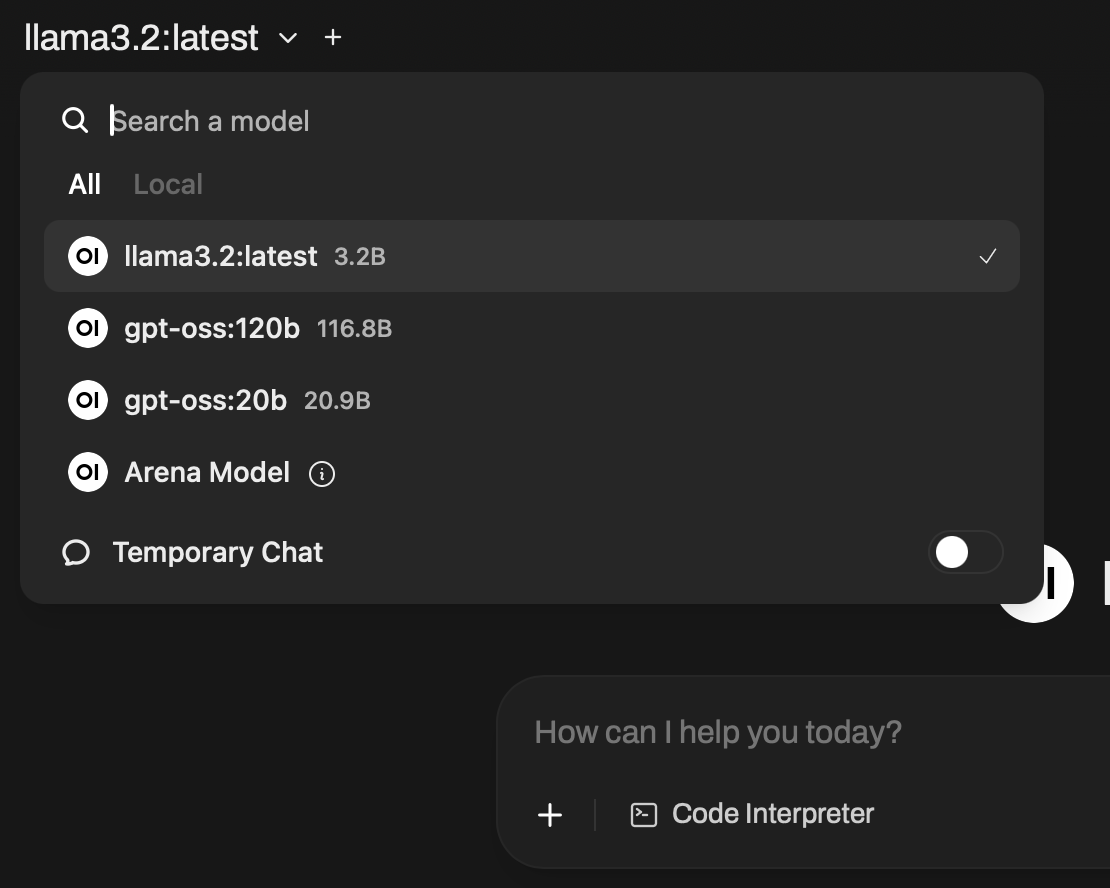
 ## Step 4 — Access the Web UI and Select the Model
1. Open the Open WebUI URL that `start-ollama` prints. It looks like `https://-8080.thundercompute.net`.
2. Choose **gpt-oss:120b** from the model dropdown.
## Step 4 — Access the Web UI and Select the Model
1. Open the Open WebUI URL that `start-ollama` prints. It looks like `https://-8080.thundercompute.net`.
2. Choose **gpt-oss:120b** from the model dropdown.
 ## Step 5 — Run GPT‑OSS 120B
Enter a prompt in the web interface, for example:
> *“Tell a tale of a seaman who found the treasure of the clouds by following the sound of thunder.”*
## Conclusion
That's it—the **cheapest way to run GPT‑OSS 120B** on Thunder Compute. For more, check out:
* [Using Docker on Thunder Compute](/guides/using-docker-on-thundercompute)
* [Using Instance Templates](/guides/using-instance-templates)
* [Running Jupyter Notebooks](/guides/running-jupyter-notebooks-on-thunder-compute)
Happy building!
## Step 5 — Run GPT‑OSS 120B
Enter a prompt in the web interface, for example:
> *“Tell a tale of a seaman who found the treasure of the clouds by following the sound of thunder.”*
## Conclusion
That's it—the **cheapest way to run GPT‑OSS 120B** on Thunder Compute. For more, check out:
* [Using Docker on Thunder Compute](/guides/using-docker-on-thundercompute)
* [Using Instance Templates](/guides/using-instance-templates)
* [Running Jupyter Notebooks](/guides/running-jupyter-notebooks-on-thunder-compute)
Happy building!