ComfyUI is the tool of choice for professionals creating AI images and videos. Its node-based workflows give you precise control over every stage of the generation pipeline, from model loading to final output. But to unlock its full potential, including video generation, high-resolution image synthesis, and multi-model pipelines, you need GPU hardware that can keep up.
This guide covers everything you need to know about using ComfyUI in the cloud: system requirements, notable models, and how to get started on a cloud GPU.
Your First ComfyUI Workflow
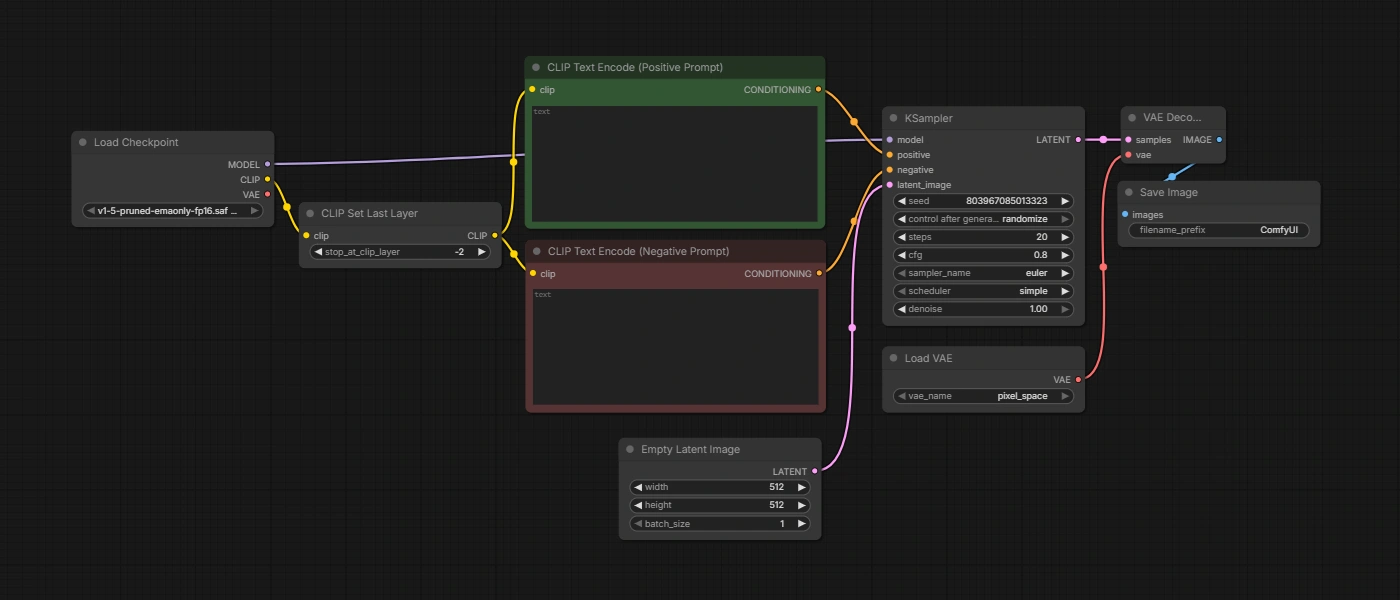
ComfyUI opens to a canvas with a pre-loaded default workflow. It is a complete text-to-image pipeline wired up and ready to run. Walking through it once is the fastest way to understand how the whole system works.
Step 1: Load the Default Workflow
When you launch ComfyUI, the default text-to-image workflow loads automatically. If the canvas is empty, click the Workflows icon in the left sidebar and select "Browse example workflows," then choose "Image Generation" to load it. You will see a series of connected rectangular blocks: these are nodes, and the colored wires between them are edges that carry data from one step to the next.
Step 2: Select a Checkpoint Model
Find the "Load Checkpoint" node on the left side of the canvas. Click the model name dropdown inside it to select a Stable Diffusion checkpoint. If no models are listed, you need to download one first and place the .safetensors file in the ComfyUI/models/checkpoints/ directory, then restart ComfyUI.
Step 3: Enter Your Prompts
Look for two nodes labeled "CLIP Text Encode (Prompt)." The top one is for your positive prompt (what you want in the image) and the bottom one is for your negative prompt (what you want to exclude). Click inside the text field on each node and type your descriptions.
Step 4: Set the Image Size
The "Empty Latent Image" node controls the output resolution. Set the width and height in pixels. For Stable Diffusion 1.5 models, 512x512 or 768x768 work well. For SDXL, use 1024x1024 as a starting point.
Step 5: Configure the KSampler
The KSampler node is where the actual image generation happens. Its key parameters are:
- Seed: The random value that determines the starting noise. Fix it to reproduce an image; randomize it to explore variations.
- Steps: How many denoising passes the model runs. 20-30 steps is a reliable starting range for most models.
- CFG (Classifier-Free Guidance): How strictly the model follows your prompt. Values between 6 and 9 work for most use cases. Lower values give the model more creative latitude.
- Sampler/Scheduler: The algorithm that controls denoising.
dpmpp_2mwith thekarrasscheduler is a common default that produces clean results quickly. - Denoise: Leave this at 1.0 for text-to-image. Values below 1.0 are used in image-to-image workflows to preserve more of the input.
Step 6: Run the Workflow
Click the "Queue Prompt" button (or press Ctrl+Enter / Cmd+Enter). Watch the progress bar advance as the model denoises the latent image step by step. When it finishes, the output image appears in the "Save Image" or "Preview Image" node on the right side of the canvas.
Step 7: Load and Share Workflows
Every workflow in ComfyUI is a JSON file. You can export your current workflow via Workflow > Export and share it with anyone who can drag the file back onto a ComfyUI canvas to load it instantly. There is also a shortcut worth knowing: ComfyUI embeds the full workflow metadata inside every PNG it generates. Drag any ComfyUI-generated image back onto the canvas and the original workflow, including the seed used, loads automatically.
Community workflows are available on OpenArt and ComfyWorkflows. Most include a note block listing the models you need to download before running them.
ComfyUI System Requirements
Running ComfyUI locally requires hardware and software that have grown alongside the models themselves. The good news is that ComfyUI is one of the most memory-efficient frontends available. Its dynamic VRAM management unloads unused models between steps, running pipelines that would crash other tools.
| Component | Minimum | Recommended | Ideal |
|---|---|---|---|
| VRAM | 6GB+ | 24 GB | 40GB+ |
| System RAM | 16 GB | 32 GB | 64 GB |
| Storage | 20 GB | 100 GB+ | |
| Python | 3.9 | 3.13 | |
| PyTorch | 2.4+ | Latest stable release | |
| OS | Windows 10, macOS | Linux | |
The biggest limiting factor is VRAM. Running a basic Stable Diffusion XL (SDXL) workflow at 1024×1024 requires around 6–8 GB of VRAM. Add a ControlNet, a few LoRAs, and a hi-res upscaling pass, and that floor can climb past 16 GB.
Video generation models like Wan 2.2's 14B variant require 16–24 GB for 480p output and more than 24 GB for 720p, putting them well beyond most consumer GPUs.
NVIDIA GPUs with Ampere architecture (RTX 30** onwards, RTX A6000, or A100s) onward are best for ComfyUI because they support FP16 and BF16 natively, precisions most modern models use. Older cards can run ComfyUI but lack hardware-accelerated half-precision and are likely to be deprecated in future CUDA releases.
ComfyUI Models
The model you load into ComfyUI determines what you can generate and how much VRAM you need. ComfyUI supports every major model architecture, and the community produces new checkpoints constantly.
Image-to-Video with ComfyUI
Image-to-video (I2V) is among the most demanding uses of ComfyUI. You provide a reference image, and the model generates a short video clip that animates from that starting frame. The quality of modern I2V models has improved dramatically, but so have the VRAM requirements.
Wan 2.2 is the leading open-source I2V model. For lighter workloads, its 5B can run on 8 GB of VRAM with ComfyUI's native offloading enabled, making it accessible to a wider range of hardware. The 14B variant, which produces significantly better motion quality and temporal consistency, requires 16–24 GB for 480p output.
Text-to-Image with ComfyUI
Text-to-image (T2I) is the foundational ComfyUI workflow. Stable Diffusion remains a popular base architecture for T2I in 2026, with a massive ecosystem of LoRAs, ControlNets, and fine-tuned checkpoints available on Civitai and Hugging Face.
A simple Stable Diffusion workload connects a checkpoint loader, two CLIP text encoders, a KSampler, and a VAE decode node, and the pipeline converts a text prompt into an image.
For more on running diffusion models in the cloud, see our guide on how to run Stable Diffusion.
Using LoRAs in ComfyUI
LoRAs (Low-Rank Adaptation files) are lightweight model add-ons that steer a base checkpoint toward a specific style, subject, or visual characteristic without replacing the underlying model.
A single LoRA file is typically 50-500 MB, compared to the 4-24 GB of a full checkpoint, which makes them practical to stack and swap.
Adding LoRAs to ComfyUI Workflows
To use a LoRA, place the .safetensors file in the ComfyUI/models/loras/ directory. Then add a "Load LoRA" node to your workflow and connect it between the Load Checkpoint node and the KSampler.
The strength_model parameter controls how strongly the LoRA influences the generation: values between 0.5 and 1.0 are typical, with lower values blending the LoRA effect more subtly into the base model's output.
Multiple Load LoRA nodes can be chained in series to stack effects. For example, you might combine a style LoRA (controlling the visual aesthetic) with a character LoRA (maintaining a specific subject's appearance) in the same workflow.
LoRAs must be trained on the same base architecture as the checkpoint you are using: an SD 1.5 LoRA will not work correctly with an SDXL or Flux checkpoint.
Where to Find LoRAs
Civitai is the largest community library for LoRAs, with hundreds of thousands of user-trained files covering art styles, photography aesthetics, specific characters, and subject types.
When downloading LoRAs on a Thunder Compute instance, the same bash command workflow described in the model installation section below applies: pass the Civitai download URLs to your preferred AI assistant and it will generate the correct wget commands for the right subdirectory.
Image-to-Image with ComfyUI
Image-to-image (I2I) workflows take an existing image as input and transform it based on a prompt and a denoising strength parameter. Lower denoising preserves more of the original image; higher values give the model more freedom to reinterpret the scene.
This is particularly useful for style transfers, consistent character editing, and iterative refinement of images that are close to but not quite what you want.
I2I is also the foundation for inpainting (replacing a masked region of an image) and outpainting (extending the canvas beyond the original edges). ComfyUI handles all three modes natively through its node graph, and models like Flux.1 Fill-dev are specifically trained for high-quality inpainting.
Popular ComfyUI Models and Where to Start
The model you choose determines image quality, style, VRAM requirements, and generation speed. The ComfyUI community has built dedicated workflows for the models below. Each one has its own checkpoint format, node requirements, and optimal settings.
Flux
Flux is an open-weight text-to-image model family developed by Black Forest Labs. It produces photorealistic outputs with strong prompt adherence, built on a rectified flow transformer architecture that allows for faster convergence and fewer inference steps than earlier Stable Diffusion models.
The family spans several variants. Flux.1 Dev became the community standard for high-quality local generation, but demands significant VRAM. The newer Flux 2 Klein series is designed for local users: the 4B distilled model needs at least 8 GB of VRAM, while the 9B model drops to around 15 GB with FP8 quantization.
See the full guide to running Flux in ComfyUI on Thunder Compute.
Stable Diffusion
Stable Diffusion remains a great starting point within the ComfyUI ecosystem. SD 1.5 runs on as little as 4-6 GB of VRAM and has the largest library of community-trained LoRAs, ControlNet models, and fine-tuned checkpoints available on Civitai and Hugging Face.
SDXL raises the quality ceiling significantly and works best at 1024x1024 with 8-12 GB of VRAM.
See the full guide to running Stable Diffusion in the cloud.
Wan 2.2
Wan 2.2 is the leading open-source model for image-to-video and text-to-video generation.
The 5B variant runs on 8 GB of VRAM with ComfyUI's native offloading enabled. The 14B variant produces better motion quality and temporal consistency but requires 16-24 GB for 480p output and more than 24 GB for 720p, putting it well beyond consumer hardware for many users.
Z-Image Turbo
Z-Image Turbo is a 6-billion-parameter image generation model that runs in just 8 inference steps, delivering photorealism comparable to Flux at significantly lower compute cost.
In standard BF16 precision it requires 14-16 GB of VRAM, the FP8 variant runs on 8 GB, and the GGUF variant scales down to 5-6 GB for lower-end cards.
Qwen for Image Generation and Editing
Qwen-Image-Edit is Alibaba's open-source image generation and editing model.
Its key differentiator is instruction-based editing: describe the change you want in plain language and the model applies it, making it well-suited for multi-image composition and complex text rendering in both English and Chinese.
The model is significantly larger than Flux at 20.4B parameters, which means higher hardware requirements: BF16 precision needs at least 40 GB of VRAM, FP8 brings that down to 16 GB, and GGUF quantized variants scale further for lower-end hardware.
See the full guide to using Qwen for image editing in ComfyUI.
How to Use ComfyUI
ComfyUI is a node graph editor served through your browser. Each node represents one operation in the generation pipeline: loading a model, encoding a prompt, sampling in latent space, or decoding the output to a visible image.
You connect nodes between their input and output ports, and when executed the graph runs from left to right.
Workflows can be imported and exported as JSON files. You can load them by dragging a .json file directly onto the ComfyUI canvas, or by using Workflow > Open from the top menu. Sites like OpenArt and ComfyWorkflows provide hundreds of community-created workflows.
ComfyUI in the Cloud: Skip the Hardware Bottleneck
The hardware requirements are making many users move their ComfyUI workflows to cloud GPUs. Video generation models alone can require 60–80 GB of VRAM, which is expensive to own. Even for image generation, the math changes significantly when you factor in the cost of buying, running, and upgrading hardware versus renting a GPU.
Thunder Compute lets you run the latest models with minimal setup and for as little as $0.35/hr. You get enterprise-grade GPU instances with persistent storage so your models and workflows stay ready between sessions. There's no local installation to manage, no driver conflicts, and no waiting for models to download.
Getting started takes three commands:
- Install the tnr CLI
- In your favorite terminal, run
tnr create --template comfy-ui - Then run
tnr connect 0to connect to the remote instance - Finally run
start comfyui, this will output a URL where you can use the tool.
Once it's running, open ComfyUI at {UUID}-8188.thundercompute.com ("UUID" is the unique identifier for your instance). This URL can be found in the terminal after running start comfyui or collapsed under your instance in VSCode.
You can import any workflow JSON, install custom nodes, and download models from Hugging Face or Civitai.
Try Thunder Compute GPUs today and run ComfyUI without hardware limits.
Installing Models for ComfyUI in the Cloud
By default, the Thunder Compute ComfyUI template only includes the basic Stable Diffusion checkpoint. This is enough for some light tinkering, but it won't get you very far.
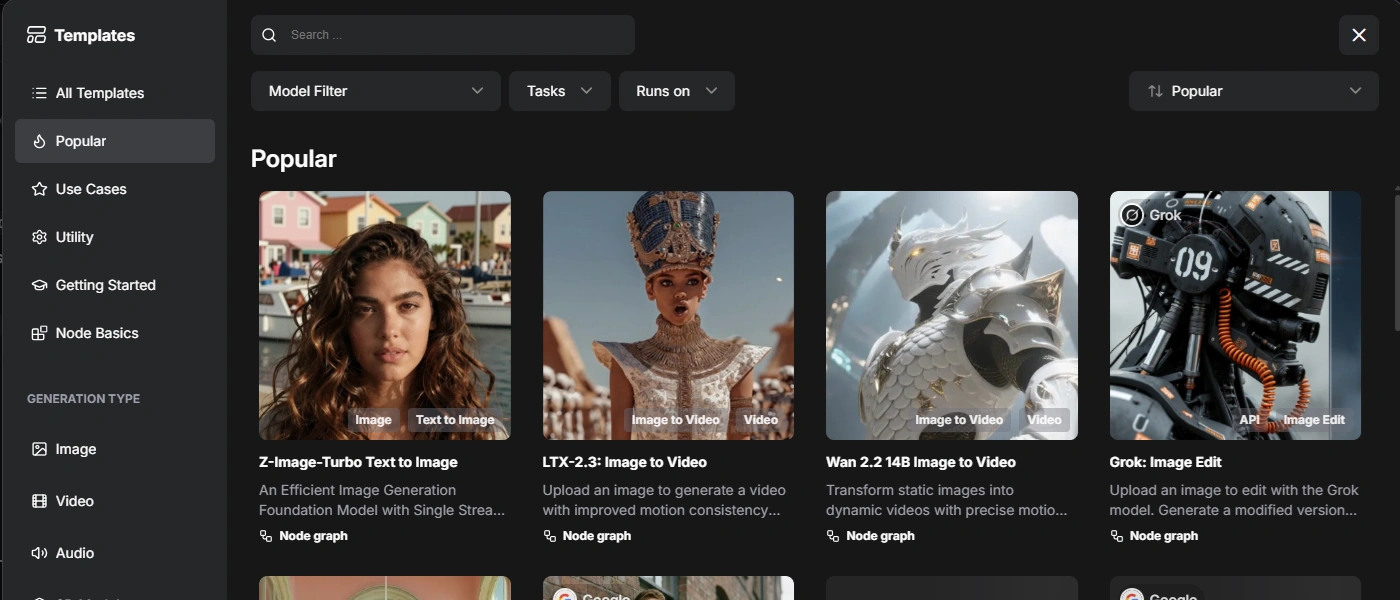
To get the most out of ComfyUI you need to download models into your instance. If unsure how to start, the Template Library has some preconfigured workflows to get you started.
Most templates include model links within a note block. If you pass these links in the prompt below along to your favourite AI, it will give you the bash commands you need to install these models.
Generate a set of bash commands to run at once and install models for ComfyUI on a Thunder Compute instance with Ubuntu. Install each model in the corresponding existing directories in '/home/ubuntu/ComfyUI/models'.
{{MODEL_URLs}}
Run these commands within your instance to download the models to the correct subdirectories under ComfyUI/models/. Once it finishes, you should be able to run the workflow template.
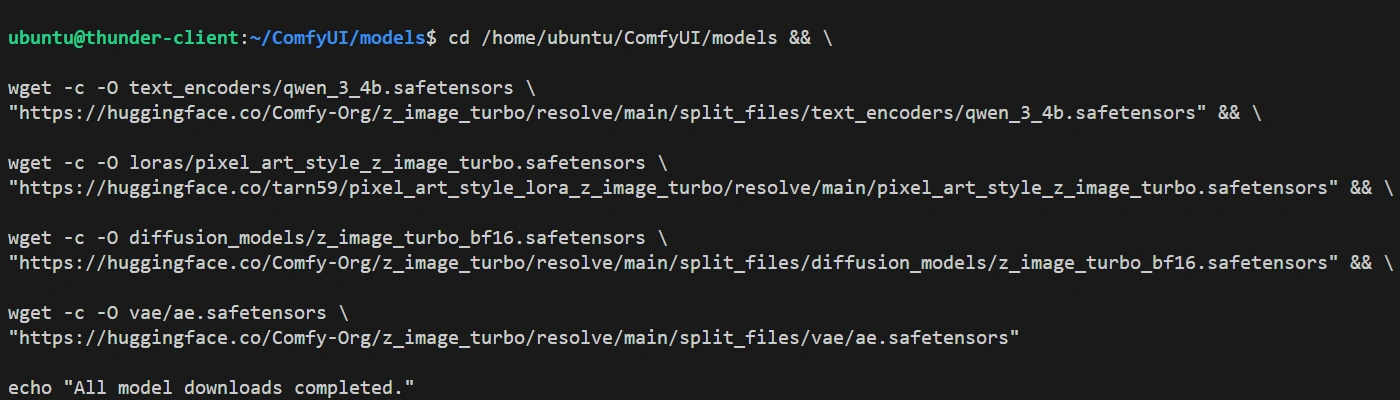
On Thunder Compute, model downloads are fast because instances run in data centers with high-bandwidth connections. Downloading around 20GB of models to run Z-image-turbo takes around 2 minutes.
ComfyUI vs. Other AI Image Generation Frontends
ComfyUI is not the only frontend for diffusion models, and it is not always the right choice for every user. Understanding what makes it different helps you choose the right tool for your workflow.
ComfyUI vs. AUTOMATIC1111
AUTOMATIC1111 (A1111) was the most widely used alternative to ComfyUI. It has a traditional tab-based interface: one input panel for prompts, settings, and model selection, and one output panel for your generated image.
The trade-off is flexibility. A1111 processes your generation as a black box: you set the inputs and receive the output, but you cannot inspect or redirect the data between steps. ComfyUI's node graph exposes every intermediate stage of the pipeline. You can preview the latent image mid-generation, branch two different samplers from the same prompt, and build workflows that require custom scripting in A1111.
If you are generating images occasionally and want predictable results with minimal setup, A1111 is the reasonable starting point. If you are building reproducible workflows, or pushing the limits, ComfyUI is the better investment.
ComfyUI vs. Forge Neo
Forge Neo is a fork of AUTOMATIC1111 that adds significant performance and memory optimizations while preserving the familiar tab-based interface.
It supports many of the same models as ComfyUI, including Flux and SDXL, and runs them with lower VRAM requirements than the equivalent A1111 setup.
The practical difference is that Forge Neo offers the simplicity of A1111 with performance improvements that narrow the gap with ComfyUI for standard image generation tasks. ComfyUI remains the stronger choice when workflow reproducibility, video generation, or complex multi-model pipelines are the goal.
Thunder Compute offers a pre-configured template for both: if you are unsure which to start with, the fastest approach is to launch one, run a generation, and switch if the interface does not suit how you work.
Last Thoughts on How to Use ComfyUI
ComfyUI is the most capable and flexible frontend for AI image and video generation available in 2026.
- Node-based architecture makes complex pipelines reproducible and shareable
- Efficient VRAM management lets you run larger models
- Active community produces new workflows and custom nodes
The main barrier is hardware. Running large models at full quality, or building pipelines with multiple ControlNets and LoRAs stacked together means you need more VRAM than most consumer GPUs provide. Cloud GPUs remove that constraint entirely.
Thunder Compute gives you enterprise-grade GPU instances for as little as $0.35/hr, with a pre-configured ComfyUI template that gets you generating in minutes rather than hours. No driver conflicts, no local environment setup, no hardware to buy. Just a fast GPU and a ComfyUI instance ready to run whatever model you want to try next.
To avoid local VRAM limits, Thunder Compute offers cost effective cloud GPUs starting at $0.35/hr. On top of that, you can start instances with ready-to-launch templates for ComfyUI and Forge Neo.
FAQ
What is ComfyUI?
ComfyUI is an open-source, node-based interface for building and running AI image and video generation pipelines. You connect processing nodes in a visual graph, each one representing a step in the generation process: loading a model, encoding a prompt, sampling, or decoding the output. This gives you control over every parameter and makes complex workflows easy to share as JSON files.
How to use ComfyUI?
ComfyUI can be used as a standalone app. To get started you can choose a workflow from the template library or import it from a JSON file. Then add a text prompt in the CLIP Text Encode nodes, and click "Run". The graph executes from left to right. Most workflows will need you to download and install relevant model files.