Unsloth Studio is a browser UI for running and training local models. This guide installs Studio on a Thunder Compute base instance, opens it through Thunder Compute port forwarding, then runs a short text fine-tune with unsloth/gemma-4-E2B-it.
This setup path and Gemma 4 E2B QLoRA training profile were verified on a single Thunder Compute A100 80 GB instance with Unsloth Studio 2026.5.2. The sample dataset below is intentionally tiny so you can confirm the workflow before training on a real dataset.
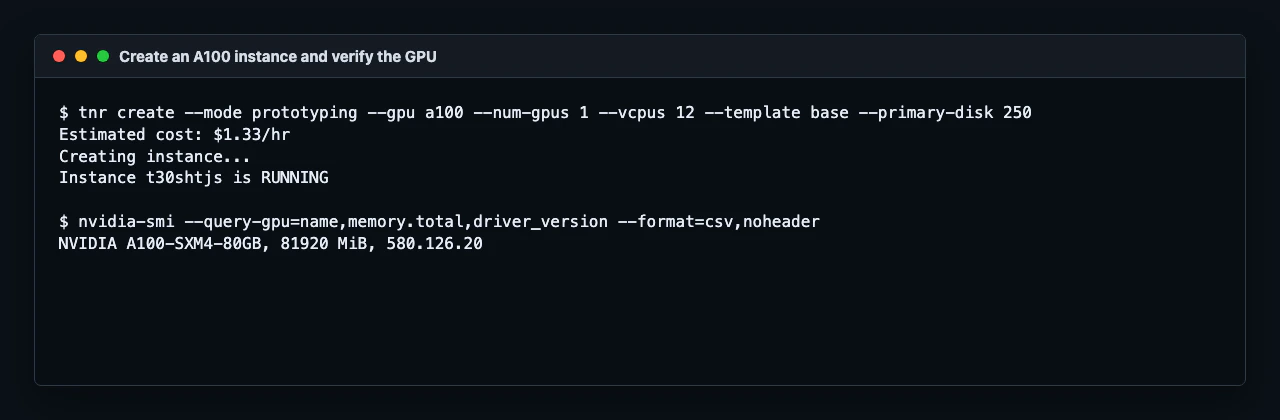
Create the instance
Create a GPU instance with the base template and enough disk for Studio, models, and datasets:
tnr create --gpu a100 --num-gpus 1 --vcpus 12 --template base --disk 250
# RTX A6000
tnr create --gpu a6000 --num-gpus 1 --vcpus 6 --template base --disk 250

# H100 80 GB
tnr create --gpu h100 --num-gpus 1 --vcpus 16 --template base --disk 250
tnr status
tnr connect <instance-id>
nvidia-smi --query-gpu=name,memory.total,driver_version --format=csv,noheader
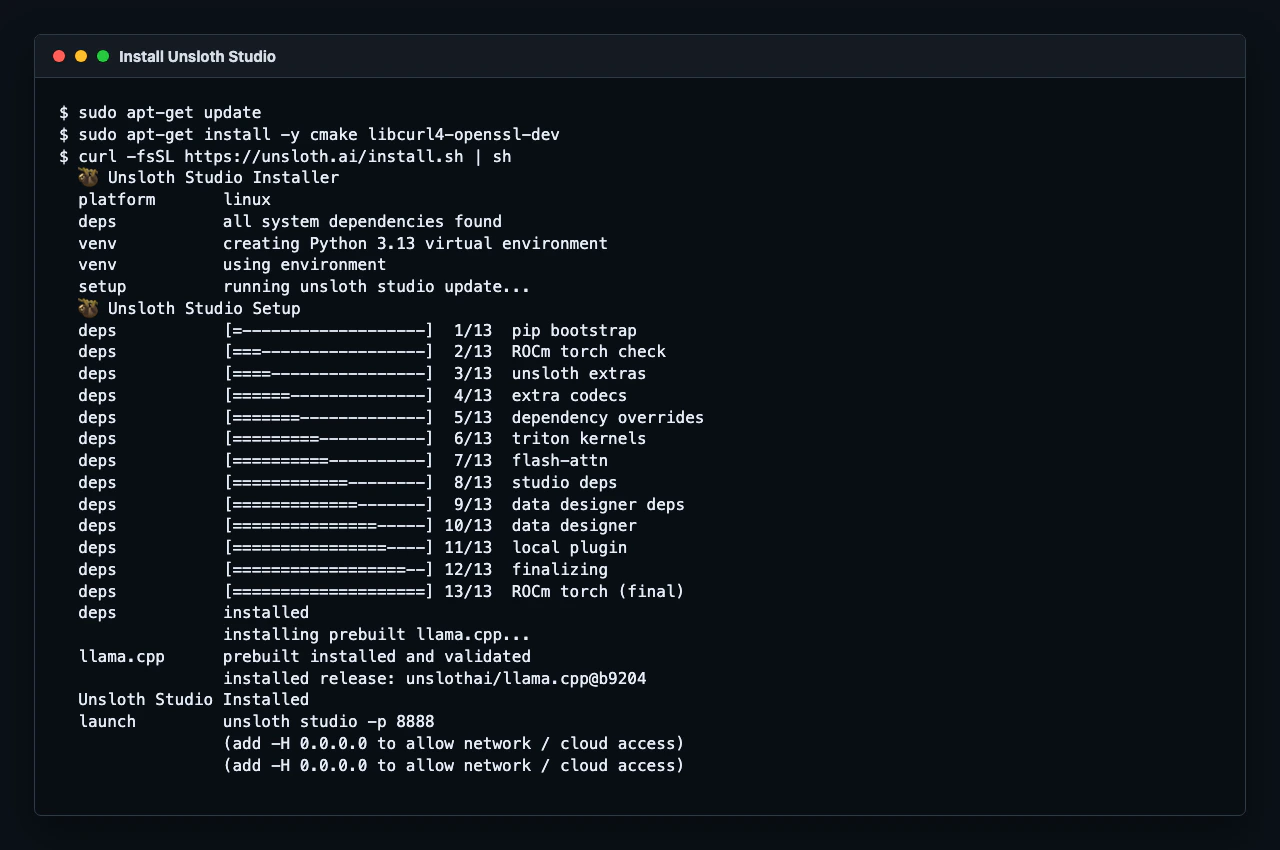
Install Unsloth Studio
Install the system packages that Unsloth Studio needs to build and run its local inference components:
sudo apt-get update
sudo apt-get install -y cmake libcurl4-openssl-dev
curl -fsSL https://unsloth.ai/install.sh | sh
~/.unsloth/studio and writes an unsloth launcher into ~/.local/bin.
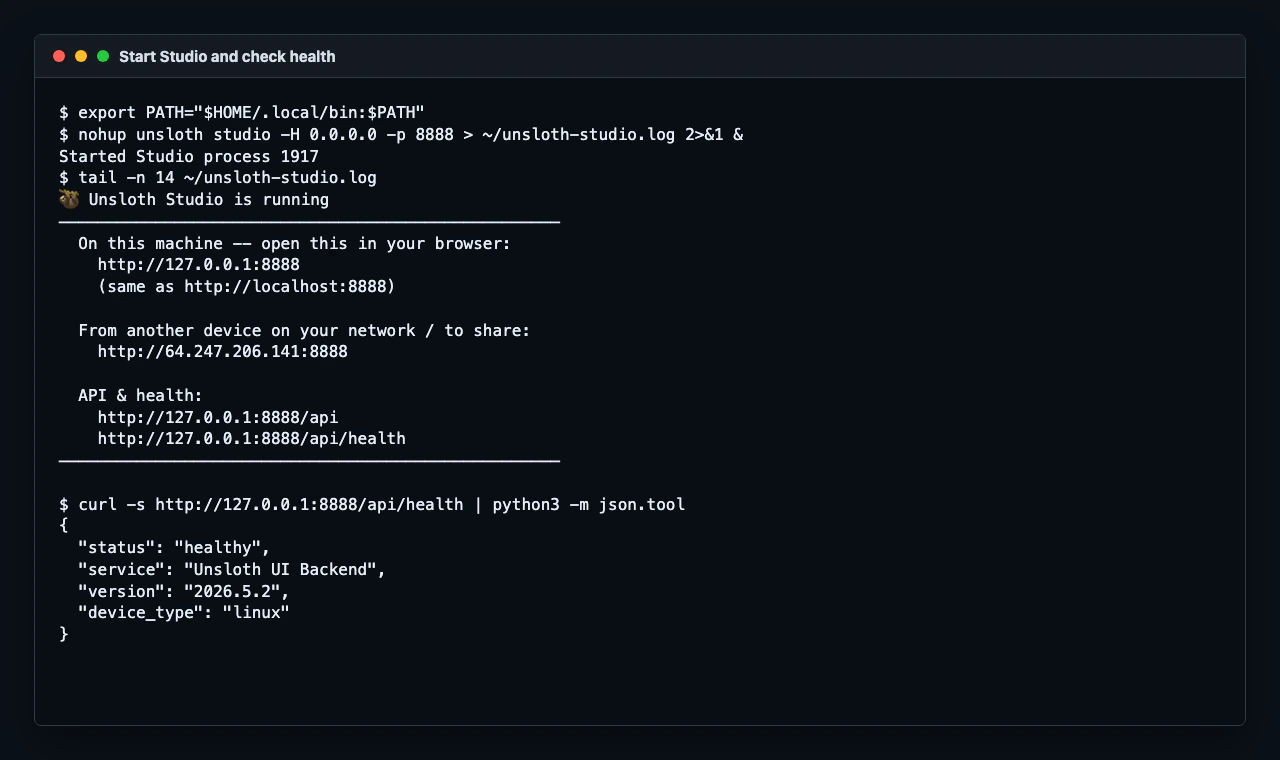
For the current SSH session, add the launcher directory to your path:
export PATH="$HOME/.local/bin:$PATH"
Start Studio
Start Unsloth Studio on port 8888 and listen on all interfaces:
nohup unsloth studio -H 0.0.0.0 -p 8888 > ~/unsloth-studio.log 2>&1 &
tail -n 40 ~/unsloth-studio.log
curl -s http://127.0.0.1:8888/api/health | python3 -m json.tool
"status":"healthy".
curl -I http://127.0.0.1:8888 may return 405 Method Not Allowed because Studio does not accept HEAD requests on /. Use curl http://127.0.0.1:8888 or /api/health instead.
Open Studio
On first launch, Studio creates a default admin user named unsloth.
Read the generated bootstrap password from the instance:
cat ~/.unsloth/studio/auth/.bootstrap_password
8888:
tnr ports forward <instance-id> --add 8888
https://<instance-uuid>-8888.thundercompute.net
| Field | Value |
|---|
| Username | unsloth |
| Password | The value from ~/.unsloth/studio/auth/.bootstrap_password |

Choose a model
Use unsloth/gemma-4-E2B-it for the first run. It is current, small enough for a quick validation run, and available from the Unsloth model presets.
If you want to scale the same flow after the first run works, use a larger available GPU and choose a larger supported model such as unsloth/gemma-4-E4B-it. unsloth/Qwen3.5-2B is also available in Studio, but start with the Gemma 4 E2B path below to keep the first fine-tune simple.
Prepare a small dataset
Create a JSONL file in Alpaca format on the computer where your browser is open. Studio’s Upload button reads from your browser’s local filesystem, not from the SSH session on the instance.
Each line should contain instruction, input, and output fields. This demo trains the model to write compact plant-care cards in a consistent format:
cat > plant-care-mini-alpaca.jsonl <<'EOF'
{"instruction":"Write a compact plant care card.","input":"Plant: basil. Location: sunny kitchen windowsill.","output":"Care card:\\nLight: Bright sun for most of the day.\\nWater: Keep soil lightly moist, not soggy.\\nWatch: Pinch flowers early so leaves stay flavorful."}
{"instruction":"Write a compact plant care card.","input":"Plant: snake plant. Location: low-light bedroom corner.","output":"Care card:\\nLight: Tolerates low light, grows faster in indirect light.\\nWater: Let soil dry fully between waterings.\\nWatch: Yellow mushy leaves usually mean overwatering."}
{"instruction":"Write a compact plant care card.","input":"Plant: pothos. Location: office shelf with indirect light.","output":"Care card:\\nLight: Medium indirect light is ideal.\\nWater: Water when the top inch of soil is dry.\\nWatch: Long bare vines can be trimmed to encourage fuller growth."}
{"instruction":"Write a compact plant care card.","input":"Plant: mint. Location: patio container with morning sun.","output":"Care card:\\nLight: Morning sun and afternoon shade work well.\\nWater: Keep soil evenly moist.\\nWatch: Grow mint in a pot so it does not take over nearby beds."}
{"instruction":"Write a compact plant care card.","input":"Plant: monstera. Location: bright living room away from direct sun.","output":"Care card:\\nLight: Bright indirect light encourages larger leaves.\\nWater: Water when the top two inches of soil dry out.\\nWatch: Give it a moss pole or support as it climbs."}
{"instruction":"Write a compact plant care card.","input":"Plant: aloe. Location: warm south-facing window.","output":"Care card:\\nLight: Strong bright light is best.\\nWater: Soak deeply, then let the soil dry out.\\nWatch: Soft translucent leaves usually mean too much water."}
{"instruction":"Write a compact plant care card.","input":"Plant: fern. Location: humid bathroom with filtered light.","output":"Care card:\\nLight: Filtered light, never harsh direct sun.\\nWater: Keep soil consistently damp.\\nWatch: Crispy tips often mean the air is too dry."}
{"instruction":"Write a compact plant care card.","input":"Plant: jade plant. Location: sunny desk near a window.","output":"Care card:\\nLight: Several hours of bright light help compact growth.\\nWater: Let the potting mix dry before watering again.\\nWatch: Wrinkled leaves can mean the plant is thirsty."}
EOF

Upload the dataset
In Unsloth Studio:
- Open
Train.
- In
Dataset, click Upload.
- Select
plant-care-mini-alpaca.jsonl.
- Confirm Studio detects the format as
alpaca.
If Studio asks for manual mapping, map:
| Dataset column | Studio field |
|---|
instruction | instruction |
input | input |
output | output |
Model section:
| Setting | Value |
|---|
| Hugging Face Model | unsloth/gemma-4-E2B-it |
| Method | QLoRA (4-bit) |
| Hugging Face Token | Leave blank for this public model |
Parameters section:
| Setting | Value |
|---|
| Max Steps | 8 for the demo run |
| Context Length | 2048 |
| Learning Rate | 0.0002 |
| Batch Size | 2 |
| Gradient Accumulation | 4 |
| Optimizer | AdamW 8-bit |
| Gradient Checkpointing | unsloth |
LoRA Settings:
| Setting | Value |
|---|
| LoRA Rank | 8 |
| LoRA Alpha | 8 |
| LoRA Dropout | 0 |
| Target Modules | all-linear |
| Fine-tune Vision Layers | Off for this text-only dataset |
| Fine-tune Language Layers | On |
| Fine-tune Attention Modules | On |
| Fine-tune MLP Modules | On |
For a real run, increase Max Steps or switch to epochs after the first validation run succeeds. Keep the first run short so you can catch dataset or setup issues quickly.
Start training
Click Start Training. The first run may spend a few minutes downloading model weights and initializing kernels before the step counter starts moving.
When the run completes, Studio shows the output path and enables Compare in Chat and Export Model.
Successful runs save the adapter to a path like:
~/.unsloth/studio/outputs/unsloth_gemma-4-E2B-it_<timestamp>
Test the adapter
Click Compare in Chat after training finishes. Studio opens the base model and fine-tuned adapter side by side.
Try a prompt that matches the dataset pattern but was not copied directly from the training rows:
Write a compact plant care card.

Plant: rosemary. Location: hot balcony with afternoon sun.
Care card, Light, Water, and Watch structure. Treat this as a workflow check, not a quality benchmark. For a real adapter, expand the dataset and test with prompts that represent the task you actually need.
Clean up
When you are done testing:
pkill -f "unsloth studio"
exit
References